はじめに
こんにちは! インフラチームの高畑です。 最近インフルエンザが流行っていて毎年かかっている私も、もうすぐかかるのではないかと日々怯えながら過ごしています。
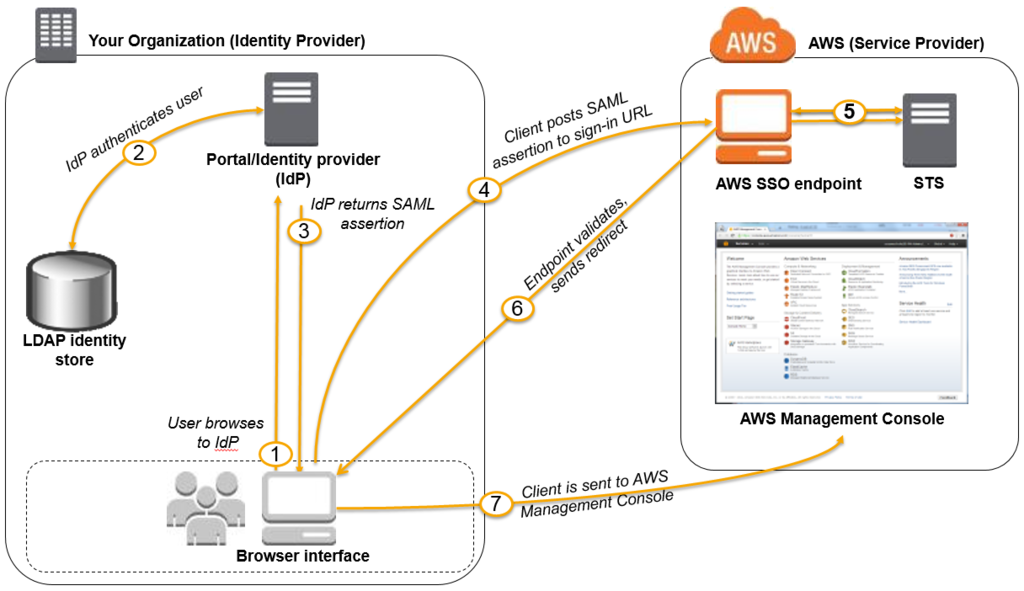
今回は SAML 2.0 ID プロバイダ(IdP) と LDAP を連携して複数アカウントで管理している AWS の SSO(シングルサインオン)化についてお話しします!
これまで何が問題だったのか
これまで弊社では AWS コントロールパネルへのログイン情報を社内サーバを使ってオンプレで運用している社内専用 wiki で管理しており、都度該当のアカウント情報をコピーしてログインを行なっていました。
そのため、法令停電などの影響で wiki を見ることができずコントロールパネルに入れないという問題や、サービス毎に AWS のアカウントを分けているため、今後もアカウントが増え続け管理が大変になるといった問題もありました。
これらの問題を解決するため、SAML 2.0 IdP (今回は SimpleSAMLphp を使用)を構築して、元々社内でアカウント管理に使用していた LDAP サーバ と連携した SSO を実現しようと動き出しました。
SAML 2.0 IdP / SP の構築
SimpleSAMLphp について
SimpleSAMLphp とは、 IdP や サービスページ( SP )を構築できる OSS です。 PHP + Web サーバが動作する環境であれば構築ができ、別途ミドルウェアが立ち上がったりもしないため手軽に導入することができます。
SimpleSAMLphp のインストール
ダウンロードページより最新版( 2019/01/17 時点での最新版は 1.16.3 )を入手してサーバに配置してください。
[root@hostname ~]# tar xvzf simplesamlphp-1.16.3.tar.gz
[root@hostname ~]# mv simplesamlphp-1.16.3 /var/www/simplesamlphp
SimpleSAMLphp 初期設定
[root@hostname ~]# vim /var/www/simplesamlphp/config/config.php
// SimpleSAMLphp の IdP 機能を有効にする
:
    'enable.saml20-idp' => true,
:
IdP 証明書を作成
[root@hostname ~]# openssl req -newkey rsa:2048 -new -x509 -days 3652 -nodes -out server.crt -keyout server.pem
Generating a 2048 bit RSA private key
............................................+++
.............+++
writing new private key to 'server.pem'
-----
You are about to be asked to enter information that will be incorporated
into your certificate request.
What you are about to enter is what is called a Distinguished Name or a DN.
There are quite a few fields but you can leave some blank
For some fields there will be a default value,
If you enter '.', the field will be left blank.
-----
Country Name (2 letter code) [XX]:国名
State or Province Name (full name) []:都道府県名
Locality Name (eg, city) [Default City]:市名
Organization Name (eg, company) [Default Company Ltd]:組織名
Organizational Unit Name (eg, section) []:部署名
Common Name (eg, your name or your server's hostname) []:IdPドメイン
Email Address []:メールアドレス

[root@hostname ~]# mv server.* /var/www/simplesamlphp/cert/
証明書、認証方法の設定
[root@hostname ~]# vim /var/www/simplesamlphp/metadata/saml20-idp-hosted.php
:
        'privatekey' => 'server.pem',
        'certificate' => 'server.crt',
:
        'auth' => 'ldap',
:
接続先LDAPの設定
LDAPに関する設定を /var/www/simplesamlphp/config/authsources.php に追記
[root@hostname ~]# vim /var/www/simplesamlphp/config/authsources.php
: //↓新規追加
    'ldap' => array(
        'ldap:LDAP',

        // Give the user an option to save their username for future login attempts
        // And when enabled, what should the default be, to save the username or not
        //'remember.username.enabled' => FALSE,
        //'remember.username.checked' => FALSE,

        // The hostname of the LDAP server.
        'hostname' => 'ldaps://LDAPドメイン',

        // Whether SSL/TLS should be used when contacting the LDAP server.
        'enable_tls' => FALSE,

        // Whether debug output from the LDAP library should be enabled.
        // Default is FALSE.
        'debug' => FALSE,

        // The timeout for accessing the LDAP server, in seconds.
        // The default is 0, which means no timeout.
        'timeout' => 0,

        // The port used when accessing the LDAP server.
        // The default is 389.
        'port' => port,

        // Set whether to follow referrals. AD Controllers may require FALSE to function.
        'referrals' => TRUE,

        // Which attributes should be retrieved from the LDAP server.
        // This can be an array of attribute names, or NULL, in which case
        // all attributes are fetched.
        'attributes' => NULL,

        // The pattern which should be used to create the users DN given the username.
        // %username% in this pattern will be replaced with the users username.
        //
        // This option is not used if the search.enable option is set to TRUE.
        'dnpattern' => 'uid=%username%,ou=people,dc=example,dc=org',

        // As an alternative to specifying a pattern for the users DN, it is possible to
        // search for the username in a set of attributes. This is enabled by this option.
        'search.enable' => TRUE,

        // The DN which will be used as a base for the search.
        // This can be a single string, in which case only that DN is searched, or an
        // array of strings, in which case they will be searched in the order given.
        'search.base' => 'Base DN',

        // The attribute(s) the username should match against.
        //
        // This is an array with one or more attribute names. Any of the attributes in
        // the array may match the value the username.
        'search.attributes' => array('uid'),

        // Additional LDAP filters appended to the search attributes
        'search.filter' => '特定の属性を持っていれば許可する等のフィルタを記述',

        // The username & password the SimpleSAMLphp should bind to before searching. If
        // this is left as NULL, no bind will be performed before searching.
        'search.username' => 'Bind DN',
        'search.password' => 'password',

        // If the directory uses privilege separation,
        // the authenticated user may not be able to retrieve
        // all required attribures, a privileged entity is required
        // to get them. This is enabled with this option.
        'priv.read' => FALSE,

        // The DN & password the SimpleSAMLphp should bind to before
        // retrieving attributes. These options are required if
        // 'priv.read' is set to TRUE.
        'priv.username' => NULL,
        'priv.password' => NULL,

    ),
:
SP 側の設定
[root@hostname ~]# vim /var/www/simplesamlphp/config/authsources.php
:
    'default-sp' => array(
:
        'entityID' => 'https://SPドメイン/simplesaml/module.php/saml/sp/metadata.php/default-sp',
        'idp' => 'https://IdPドメイン/simplesaml/saml2/idp/metadata.php',
:
管理画面ログイン用アカウントのパスワードを変更
[root@hostname ~]# vim /var/www/simplesamlphp/config/config.php
:
    'auth.adminpassword' => 'P@ssw0rd',  // 初期値123
:
Apache の設定をする
[root@hostname ~]# vim /etc/httpd/conf.d/vhost.conf
<VirtualHost *:443>
    ServerName IdPドメイン
    DocumentRoot /var/www/simplesamlphp/www

    ErrorLog /var/log/httpd/idp-error.log
    CustomLog /var/log/httpd/idp-access.log combined

    Alias /simplesaml /var/www/simplesamlphp/www
</VirtualHost>

<VirtualHost *:443>
    ServerName SPドメイン
    DocumentRoot /var/www/simplesamlphp/www

    ErrorLog /var/log/httpd/sp-error.log
    CustomLog /var/log/httpd/sp-access.log combined

    Alias /simplesaml /var/www/simplesamlphp/www
</VirtualHost>
https://SPページのドメイン/simplesaml にアクセスができればOKです!
【管理者ユーザID】admin
【パスワード】設定したもの
管理者ログインできることも確認しましょう!
IdP、SP のメタデータを設定
(1) 上記URLより管理者でログイン
(2) 連携タブを開くと下図のようになっているか確認
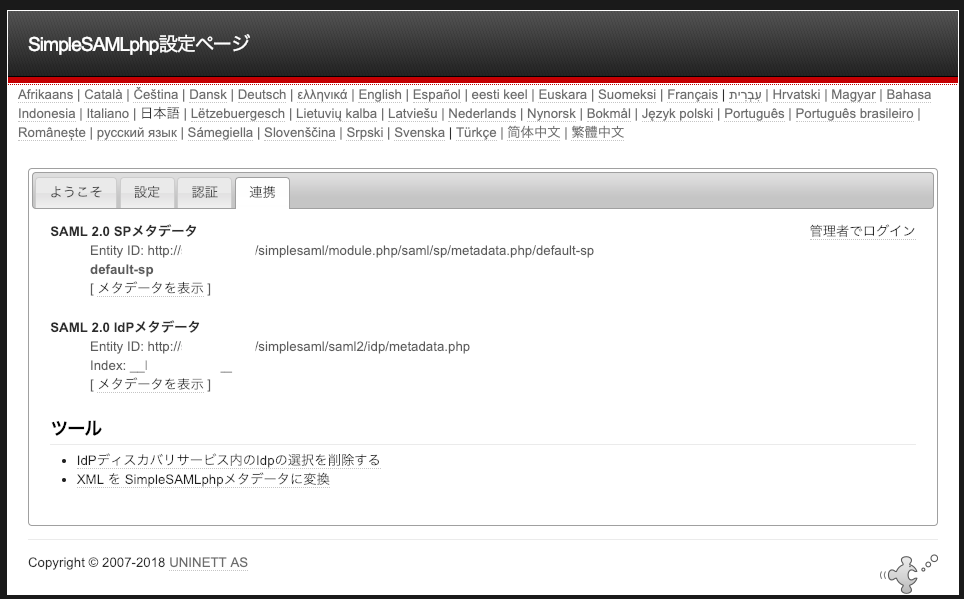 「SAML 2.0 SP メタデータ」と「SAML 2.0 IdP メタデータ」の両方が表示されていない場合は設定が抜けているので再確認しましょう!
(3) それぞれのメタデータをコピーし、「XML を SimpleSAMLphp メタデータに変換」から変換し、
IdPメタデータ → /var/www/simplesamlphp/metadata/saml20-idp-remote.php
SPメタデータ → /var/www/simplesamlphp/metadata/saml20-sp-remote.php
にそれぞれ記載
AWS 側での設定
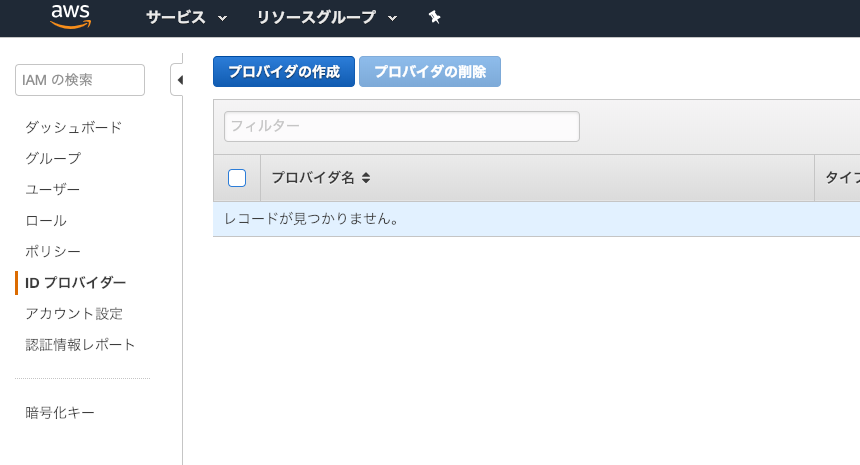
(1) IAMのページからIDプロバイダーを作成
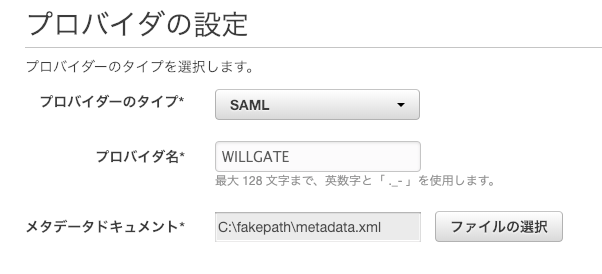
(2) プロバイダータイプは「SAML」、プロバイダ名は適宜、メタデータドキュメントはsimpleSAMLphpのメタデータを選択
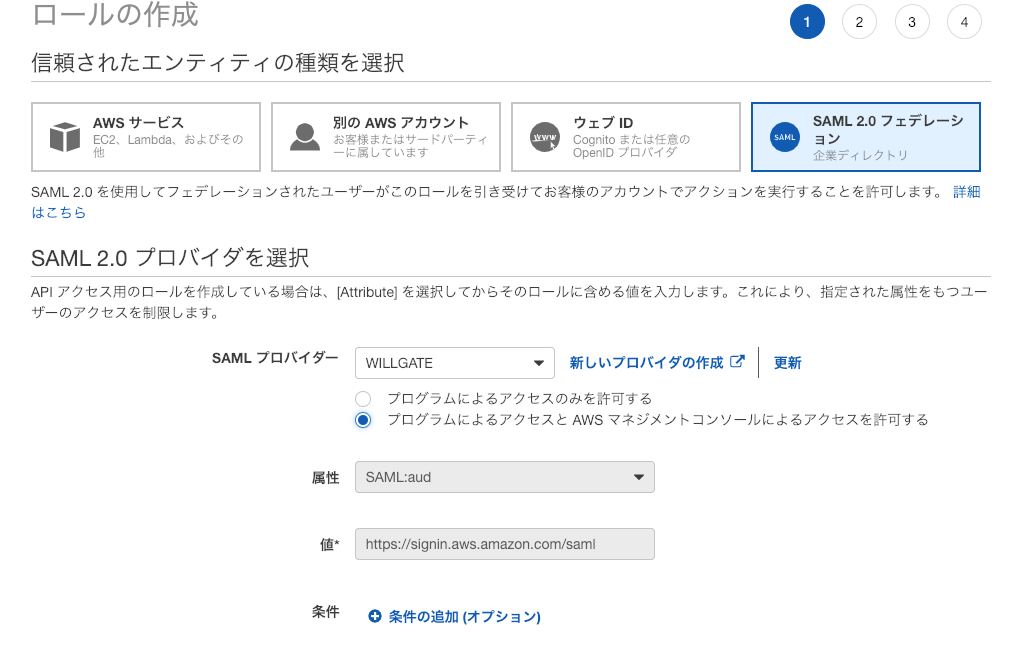
(3) IAMロールを作成
SAMLプロバイダーは (2) で作成したプロバイダを選択し、「プログラムによるアクセスとAWSマネジメントコンソールによるアクセスを許可する」にチェック
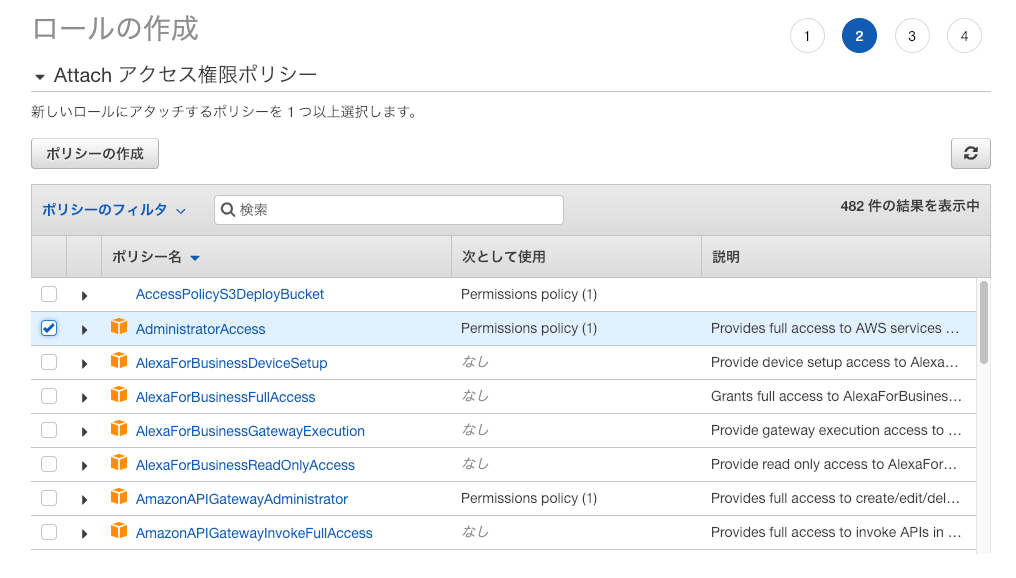
アタッチするポリシーでは「AdministratorAccess」を選択 ※実際には許可するポリシーを選択してください
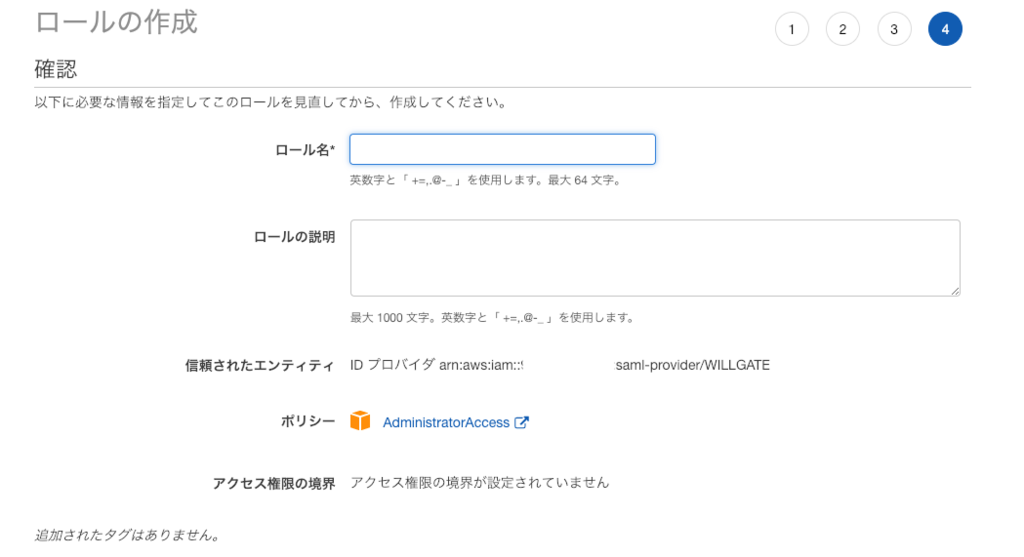
ロール名に分かりやすい名前を入力
※SAML認証した後に表示されるロールの選択画面で表示される名前なので、サービス名など分かりやすい名前にしましょう!
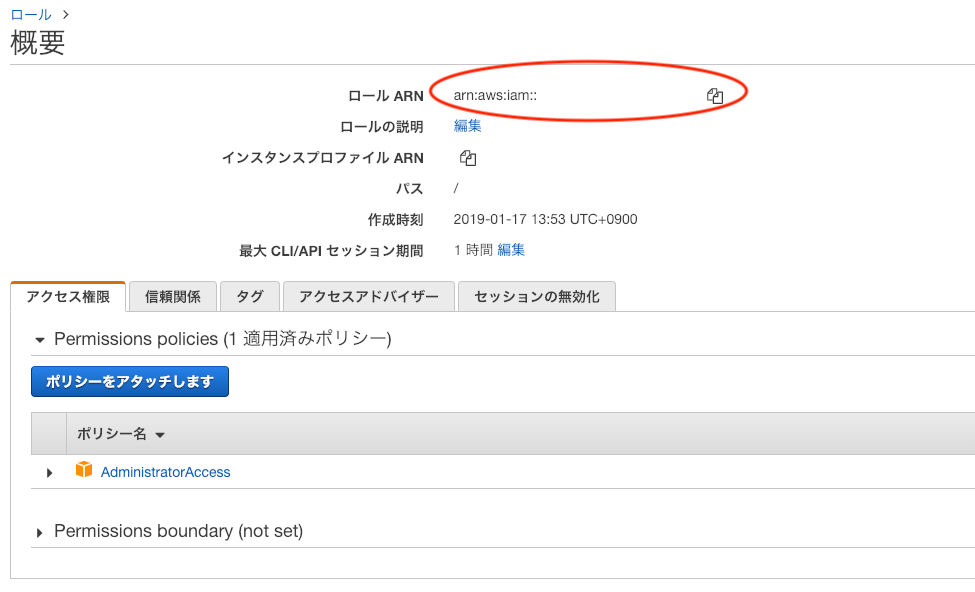
作成したロールの arn をコピーしておく(simpleSAMLphpの設定で使用します)
SimpleSAMLphp でロール、プロバイダの設定を行う
[root@hostname ~]# vim /var/www/simplesamlphp/config/config.php

 857     'authproc.idp' => array(
                  // n は連番でよしなに
                  // https://aws.amazon.com/SAML/Attributes/Role の部分は、 ロールのarn,SAMLプロバイダのarn      ←カンマ区切りにするのを忘れずに!
                 n => array(
                     'class' => 'core:AttributeAdd',
                     'https://aws.amazon.com/SAML/Attributes/Role' => array('コピーしたロールのarn,arn:aws:iam::アカウントID:saml-provider/プロバイダ名')
                 ),
                :
                :
                複数アカウントがあれば同様にここへ追記
                :
                :
以上で設定が完了です!
https://SPドメイン/simplesaml/saml2/idp/SSOService.php?spentityid=urn:amazon:webservices にアクセスして LDAP ユーザで認証ができれば OK !
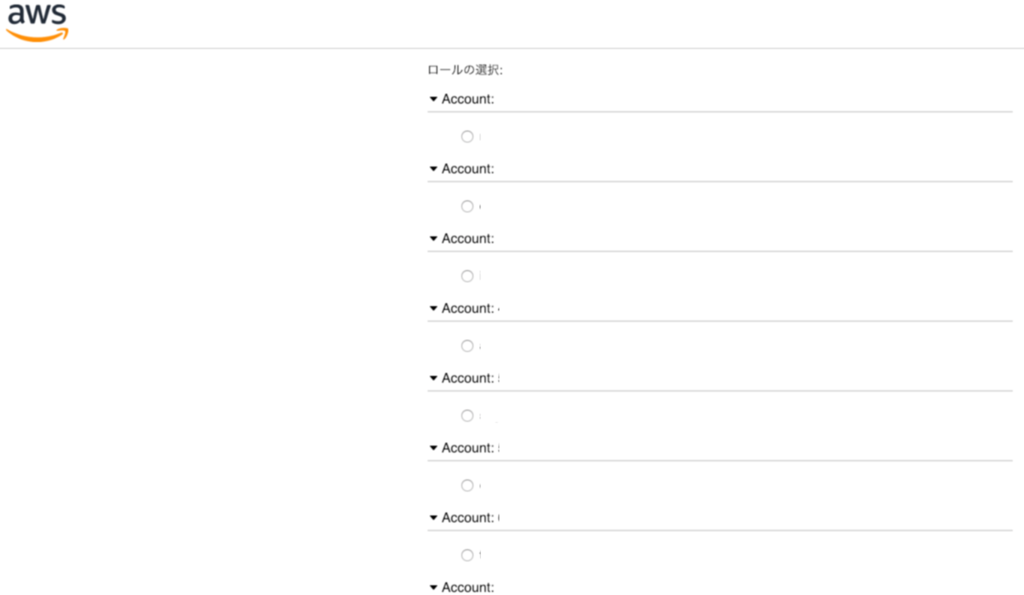
認証が問題なければ以下のようなロール選択画面に移動するので、ログインしたい AWS アカウントのロールを選択してログインができます!
SSOを導入してみて
今回 SAML 認証を利用して AWS の SSO を設定したことで、複数アカウントの管理が楽になり、停電などの影響も受けなくなりました!
常日頃利用している LDAP のユーザ ID とパスワードで AWS のコンソールにログインすることができるので、一々 ID やパスワードを確認する必要がなくなりちょっとだけ負担を軽くすることに成功したと思っています。
同じようなことで悩んでいる方がいらっしゃれば参考になると幸いです。
